Course Content
Introduction
Here is what to expect
0/3
Unit 1A: Purpose and Technique (50%) (Purpose)
A. Purpose of radiographic images 1. Periapical 2. Bitewing 3. Full mouth series 4. Occlusal 5. Full-mouth survey 6. Panoramic 7. Cephalometric 8. CBCT (cone-beam computed tomography) B. Technique 1. Review patient medical and dental histories for contraindications, including medications. 2. Intraoral techniques, including error correction. a. Paralleling b. Bisecting angle 3. Extraoral techniques, including error correction. a. Panoramic b. Cephalometric c. CBCT (cone-beam computed tomography) basics 4. Technique modifications based on anatomical variations and clinical conditions. 5. Purpose and maintenance of radiographic equipment. 6. Patient management techniques. 7. Mounting and anatomical landmarks that aid in mounting. 8. Anatomical structures and dental materials observed on images (e.g., differentiating between radiolucent and radiopaque areas). 9. Features of a diagnostically acceptable image. 10. Prepare images for legal requirements (e.g., HIPAA).
0/19
Unit 2A: Radiation production (25%)
Radiation production. 1. Sources of radiation for operators/other staff during radiation production. 2. Factors affecting x-ray production (e.g., kVp, mA, exposure time). 3. Radiation characteristics. 4. Radiation physics. a. Primary. b. Scatter (secondary). 5. Radiation biology. a. Short-and long-term effects of radiation on cells and tissues. b. Concepts of radiation dose.
0/8
Unit 2B: Radiation Safety
Radiation safety. 1. Causes of unnecessary exposure to radiation. 2. Patient exposure to radiation (ALARA, ADA recommendations). 3. Factors that influence radiation safety (e.g., filtration, shielding, collimation, PID length). 4. Patient radiation concerns. 5. Informed consent or patient refusal for exposure to radiation. 6. Protocol for suspected x-ray machine malfunctions.
0/9
Unit 3A: Standard precautions for equipment and supplies (25%)
Standard precautions for equipment and supplies according to ADA, CDC and OSHA, including but not limited to: 1. breakdown and setup of treatment room. 2. barriers. 3. position indicating and beam alignment devices. 4. clinical contact surfaces. 5. critical and semi-critical instrument sterilization
0/7
Unit 3B: Standard precautions for patients and operators
Standard precautions for patients and operators according to ADA, CDC and OSHA, including but not limited to: 1. hand hygiene. 2. PPE (donning, doffing). 3. cross contamination.
0/8
Vocabulary Terms
0/1
Practice Exams
0/1
RHS Exam Prep

Periapical Radiographs (PA)

Domain: Purpose and Technique

A Periapical (PA) image is the only intraoral view that captures the entire tooth. In clinical practice, these are used to “rule out” infection at the root tip and evaluate the supporting bone structure.

1. Diagnostic Quality Criteria

A PA is considered “non-diagnostic” (unusable) if it does not meet these three specific DANB requirements:

  • The Full Crown: The incisal edge or occlusal surface must be visible.
  • The Full Root: The entire length of the root must be captured.
  • The Apex + 2-3mm: You must see 2.0 to 3.0 mm of alveolar bone beyond the root tip (apex).

2. Placement Techniques

There are two primary ways to position the sensor/film for a PA. You must know when to use each.

Technique The Rule Key Benefit
Paralleling The sensor is parallel to the tooth’s long axis. Most accurate; lowest dimensional distortion. Standard of care.
Bisecting The sensor is at an angle; the beam is aimed at the imaginary bisector. Useful for shallow palates, small children, or bony growths (tori).

3. Mastering Angulation

Correcting errors is a major part of the RHS exam. If your image is distorted, check your angles:

Vertical Angulation (Up/Down)

Incorrect vertical angulation results in Elongation (too long) or Foreshortening (too short).

Horizontal Angulation (Side/Side)

Incorrect horizontal angulation results in overlapping of the interproximal contacts.

📝 Study Strategy: The “Golden Rule.”

If you are capturing a PA of the Maxillary Molars and you see the Zygomatic Process (U-shaped white line) or the Maxillary Sinus, you have the correct placement. These landmarks prove you are in the right spot!

Module: Periapical Radiographs for Dental Assistants Preparing for the RHS Exam

Objectives:

  1. Understand the purpose of periapical radiographs.
  2. Master the technique of capturing periapical images.
  3. Learn about common errors and how to correct them.
  4. Know the safety protocols associated with periapical radiography.

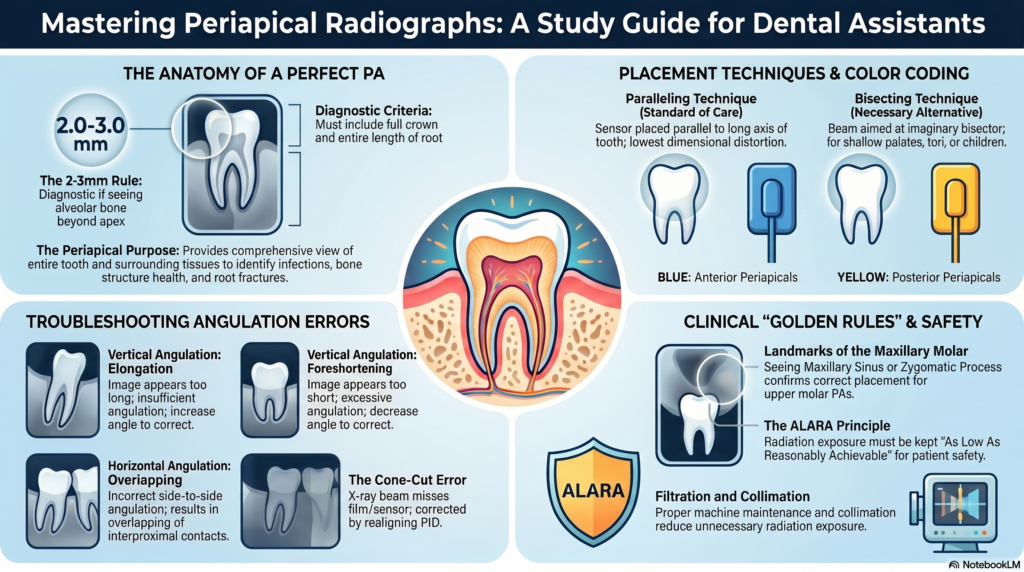
Section 1: Purpose of Periapical Radiographs

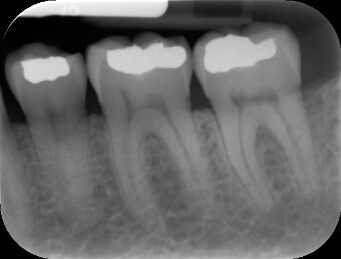
Periapical radiographs provide a comprehensive view of the entire tooth—from the crown to the root tip—and the surrounding periapical tissues. These images are crucial for:

  • Assessing overall tooth health
  • Identifying periapical infections
  • Evaluating root fractures
  • Examining the surrounding bone structure

Section 2: Technique for Capturing Periapical Images

Paralleling Technique is the most commonly used method for capturing periapical radiographs. Here’s how to do it:

  1. Positioning the Patient: The patient should be seated with their head stabilized.
  2. Positioning the Film: Use a film holder to keep the film parallel to the tooth’s long axis.
  3. Aligning the X-ray Beam: The central ray should be perpendicular to both the tooth and film.

Section 3: Common Errors and Corrections

  1. Cone-Cut: Occurs when the X-ray beam misses the film.
    • Correction: Realign the PID (Position Indicating Device).
  2. Foreshortening: Caused by excessive vertical angulation.
    • Correction: Adjust the angulation to be more perpendicular to the tooth and film.
  3. Elongation: Results from insufficient vertical angulation.
    • Correction: Increase the vertical angulation.

Section 4: Safety Protocols

  1. ALARA Principle: Always adhere to the ALARA (As Low As Reasonably Achievable) principle to minimize patient radiation exposure.
  2. Infection Control: Always follow standard precautions for equipment and supplies as advised by the CDC.
  3. Filtration and Collimation: Ensure that the machine has proper filtration and collimation to reduce unnecessary radiation.
Anterior Periapical placement for x-ray holder (blue)

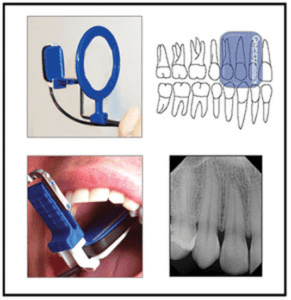
Anterior Periapical placement for the X-ray holder is BLUE


X-Ray holder placement for Posterior Periapical

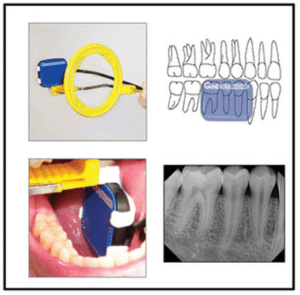
X-Ray holder placement for Posterior Periapical YELLOW


Anterior Periapical X-Ray holder placement (Blue)


Exercise Files
101 Periapical Radiographs.mp3.mp3
Size: 0.00 B