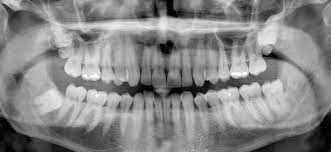
Panoramic Radiography
Extraoral Imaging & Survey Techniques
🎯 Learning Objectives
- Define the primary purpose and limitations of a panoramic image.
- Identify the Focal Trough and its role in image clarity.
- Recognize and correct common positioning errors (Chin too high/low).
- Understand the unique safety requirements for extraoral imaging.
1. Purpose & Limitations
A panoramic radiograph (Pano) provides a wide-view “landscape” of the entire maxilla, mandible, and surrounding structures on a single image.
Best For:
- Impacted 3rd molars (wisdom teeth).
- Evaluating growth and development.
- Detecting large lesions or jaw fractures.
Not For:
- Detecting interproximal caries (cavities).
- Detailed periodontal evaluation.
- Fine apical infections.
2. The Focal Trough
The Focal Trough (also called the image layer) is a three-dimensional curved zone where structures are clearly visible. If the patient is outside this zone, the image will be blurred or distorted.
3. Positioning Errors (The “Exam Favorites”)
The RHS exam loves to show you a distorted Pano and ask “What went wrong?” Here is your cheat sheet:
| Error Appearance | The Cause |
|---|---|
| “Exaggerated Smile” | Patient’s chin was too low (tipped down). |
| “Flat Smile” or Frown | Patient’s chin was too high (tipped up). |
| Dark shadow over roots | Tongue was not against the roof of the mouth. |
| “Ghost Image” | Metallic objects (earrings, dentures) were not removed. |
🚨 DANB EXAM ALERT: Safety First
Question: How is the lead apron applied differently for a panoramic image?
Answer: For a Pano, you must use a lead apron WITHOUT a thyroid collar. Because the machine rotates around the neck, a thyroid collar will block the beam, creating a “Shark Fin” radiopaque shadow on the image.